
Last year, Facebook Engineering published their technique for generating preview images. This article describes the general process of how to generate great looking previews using a tiny amount of data (200 bytes). At the same time this was published, we were working on a solution internally for generating placeholder images to reduce load time on pages with a lot of images. This initial plugin used simple colours and gradients to generate a quick placeholder.
Since Facebook published their article, we’ve been working on an improved placeholder generator using this technique. We’re releasing this today as a plugin called Gaussholder.

The theory behind the process
The key to how Facebook’s technique works is the Gaussian blur. Gaussian blurs are one of the most common types of blurs, as they’re relatively quick to process due to certain mathematical properties (separability and circular symmetry). The name “Gaussian” in this case comes from the Gaussian distribution, also known as the normal distribution, or more colloquially as a bell curve. The central limit theorem means Gaussian blurs can be approximated quickly by repeated box blurs; modern browsers typically implement blurring with a three-pass box blur.
More importantly for us, Gaussian blurs act as a low-pass filter. This removes high frequency information from the image; intuitively, this makes sense, as a blurred image has less detail than an unblurred image. Crucially, this means if we’re going to blur an image, we don’t need the full data. This is one of the critical observations that Facebook made in their original articles.
Our first try at placeholders
Working with large-scale clients and partners often means large-scale content. For one of our partners, United Influencers, this means hundreds of images on their homepage. Without lazyload, their homepage would take roughly forever to load (based on our quick calculations). However, simple lazyloading isn’t particularly useful for visitors who want to scroll through and browse the latest posts quickly.
We decided to work on a placeholder solution to provide a better user experience, and improve the perceived load time of the page. This initial pass simply found the most used colours in the image using The League of Extraordinary Packages’ ColorExtractor project. These colours could then be used as the static background colour for the image while it loads. This included both a single static background colour, as well as layered linear gradients to incorporate more variation.

This technique works well enough for many images, but is far from perfect. In particular, the most used colour (the mode) may be far from the “average” color (the mean). When used for gradients, these can be even more inaccurate, as the corners may be nothing like the most used colours.
Testing out the Facebook approach
At the same time we were developing our original approach, Facebook had been working on their technique. We’d been discussing our approach internally (and at our yearly retreat in Zahara, Spain) when FB published their article, which we immediately saw was a huge improvement on our approach. Myself and a few other humans happened to be coworking in Berlin at the time (did I mention we’re hiring?), so we started discussing this and working on an initial implementation.
We had an initial proof-of-concept working quickly afterwards, but as it always turns out, the devil is in the details. We’ll come back to that, but first, let’s talk about how to do the basics.
Learning about JPEGs
The Facebook approach outlines the basic technique for how they approached this: downscale the image to an appropriate size, strip the JPEG header, recombine the header on the client, then upscale and blur on the client.
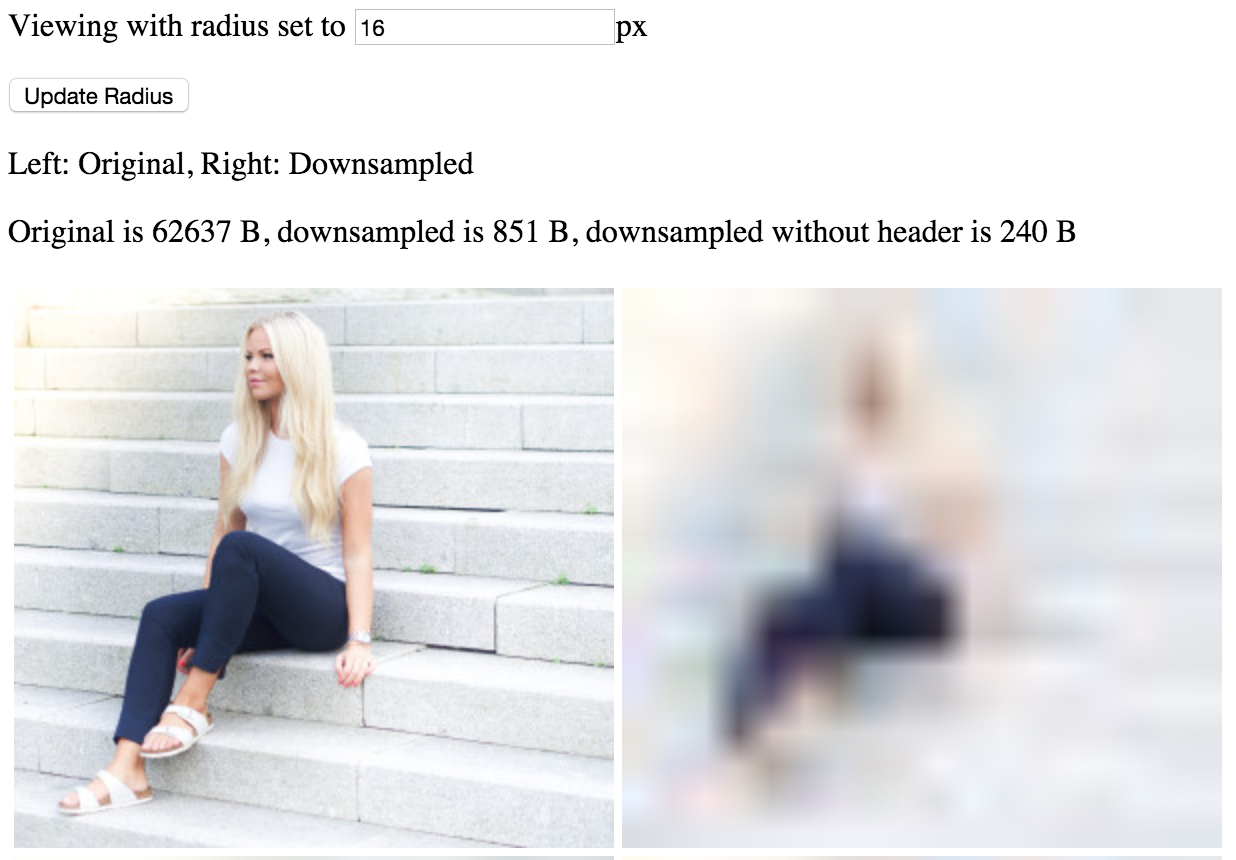
In PHP, downscaling (i.e. resizing) an image is pretty simple. The first step when working with images is to pull out our universal image tool, ImageMagick. Working out the exact size to scale down to is a bit of an art, so to test this out, I grabbed an image from the United Influencers homepage and wrote a quick tool to let me test different sizes.
Once the easy part was done, it was time to dive into JPEGs. Facebook noted that stripping the mostly-static JPEG header had decreased image size by 400 bytes, so there was clear potential here to make gains. While we can’t ship the static header with a client application and remove it from the network completely, taking this out of each image means one copy of the header per page, rather than per image. For a page with a hundred images, this is a reduction of 39KB of extra data off the page.
As it turns out, a JPEG is actually a wrapper around one of two types: EXIF, or JFIF. After struggling through reading the specifications, I managed to have a reasonably workable header. However, this header would break on different images. I discovered that ImageMagick optimises the Huffman quantization tables, which specify the lossy compression used on the image. After turning this off, and telling ImageMagick to strip other headers that might change per-image (such as camera information), we’re left with a mostly static header. This header contains two pieces that change per image: the height and the width. Unlike Facebook, we’re not working with fixed-size original images, so we need to change these for each image. By storing the position of these bits in the header, we can change them later on the client side to match the image we’re working with.
With the header handled, the next step is working out how the blur affects the image. There’s a wealth of documentation on the relationship between downsampling and the blur function, with the general finding that a downscaling factor between 1 and 1.6 times the blur radius is optimal. (For Gaussholder, this factor is fixed at 1, but we’re continuing to investigate the benefits of a higher radius.) This means that for a blur radius of 16px, the image can be scaled to 1/16th of its original size with minimal change in quality.


Working with/against the browser
With the image generation sorted, the next step is implementing the client-side portion. This needs to take our partial image and header, recombine them, adjust the header to match the image, upscale to the original size, and apply the appropriate amount of blur.
Thankfully, the hardest part of this, the blurring, has been implemented many times before. Gaussholder uses the wonderful StackBlur library by Mario Klingemann to handle this, which uses multiple box blurs to closely approximate a Gaussian blur.
Modern browsers also provide capable functionality to deal with bitwise operations with the Uint8Array object. Coupled with the canvas element, this allows us to recreate the JPEG easily in memory and render it onto the page.
The next step is to lazily load the real image when we need on the page. While standard lazyloading techniques would work here, I wanted a nice transition between the placeholder and the image, using an animation on a blur. Bad idea. As it turns out, client-side filters and clipping has interesting browser support to say the least. After much wrestling with this, I eventually got the effect I wanted (although it did require a little bit of SVG wrangling).
(Interesting note: while StackBlur appears to use the supplied radius as half of sigma value for the Gaussian kernel, similar to CSS blur radii for text-shadow and box-shadow. However, CSS’s filter: blur is implemented internally as SVG, which uses the radius as sigma directly. This means that we need to halve the stored radius before supplying it to filter: blur.)
Integrating into WordPress
The capstone of Gaussholder is the integration into WordPress. Unlike Facebook’s fixed-size cover images, WordPress data varies from site to site and post to post, with no two images the same. For this reason, Gaussholder does nothing by default, with behaviour opt-in instead. While we could generate placeholder images automatically on activation and try to calculate the radius for you, we think it’s much better to be explicit. For example, for the United Influencers site, we only need Gaussholder active for the image sizes used on the homepage. Generating placeholders for every size would quickly add up to a huge amount of data, which we simply don’t need for the most part.
Putting all this together gives us a solid, lightweight solution for placeholders in WordPress. For reference, our original gradient-based approach added roughly 400 bytes of inline styles to each element; our Gaussholder approach adds 600 bytes of base64-encoded JPEG data to each image, for a much better preview.
Gaussholder is a developer-only plugin, as it contains significantly advanced code that you probably don’t want to use on anything but the largest sites. It does have overhead (in the form of inline JavaScript and SVGs), so it’s important to be conscious of the tradeoffs involved.
We’re not done with the project yet, and it’s far from perfect, but it’s ready to release. We’d love to hear your thoughts on Gaussholder, and we’re always looking for any improvements we can make. We hope you like it.
